Workbench guide
How to Create a Consistent AI Mascot and Prepare It for Animation
The real process behind an animated product mascot: the ideas we threw away, the prompts that worked, how to keep the character consistent, and how to cut it into parts you can animate.
In this piece
Why it matters
A mascot that changes shape from one image to the next looks careless. Locking the design early is what makes animation possible.
This guide shows how we made the robot mascot for Sociora, a social media publishing app, and how we got it ready to move. It is not a theory piece. Every prompt below is one we actually used, with our brand details swapped for placeholders, and every image is from the real project, including the ideas we threw away.
You will learn how to:
- pick a character that comes from what your product does, not from a random shape
- get an AI image tool to draw the same character again and again
- turn one flat picture into separate parts that can be animated
- check the result like a visitor would, not like the person who made it
The short version: generate in ChatGPT, lock the design with a character sheet, cut the parts from the image you approved, and animate in code with Claude.
What you need
| Tool | Cost | What it is for |
|---|---|---|
| ChatGPT with image generation | Free plan available, with lower limits than paid plans | Drawing the character, the scene and the separate parts |
| Claude or Claude Code | Claude Code needs a paid Claude plan or API credits | Critiquing images, writing prompts, cutting out parts and writing the animation code |
| A code editor and a web browser | Free | Running and checking the animation |
| Google Lens or TinEye | Free | Checking that your mascot does not look like an existing one |
OpenAI does not publish a fixed number of free images, and it changes its limits, so check [1] before you plan around it. The same goes for [2].
The steps at a glance
- Decide what the mascot is doing, based on your product.
- Generate one scene and critique it honestly.
- Fix it in the same chat until one version is clearly right.
- Lock that version with a character sheet.
- Generate the background and small props as separate images.
- Cut the character into layers from the approved image.
- Animate the layers with code.
- Compare every build with the approved image before calling it done.
Step 1: Start from what your product does
Our first three ideas failed, and they failed for the same reason. We started with shapes instead of meaning.
We tried a "living S" based on the logo letter. It came out looking like a worm. We tried a desk bell, the kind you tap at a hotel front desk, with eyes. It was cute, but a stranger would see a bell, not a social media tool. It also had no hands, so it could not do anything.
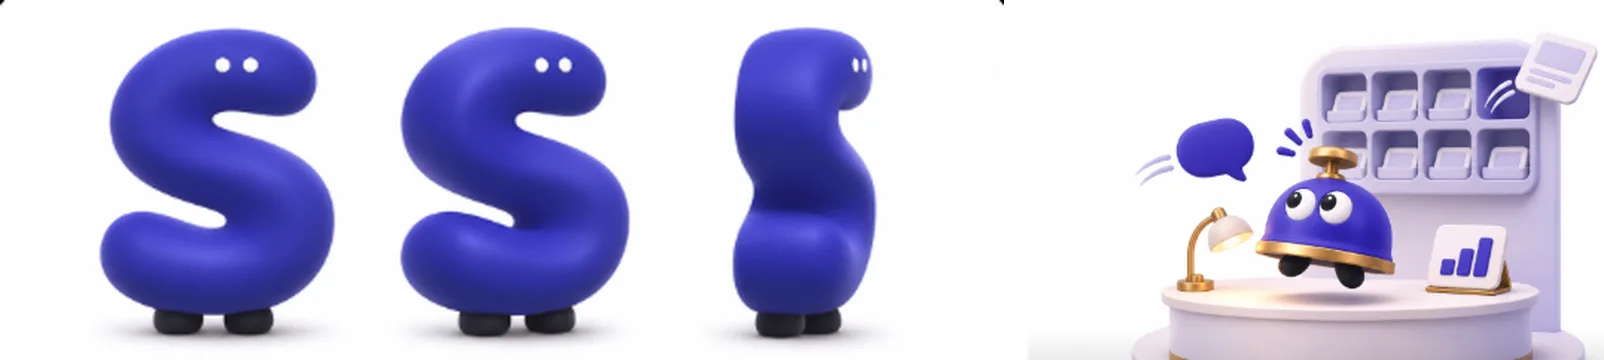
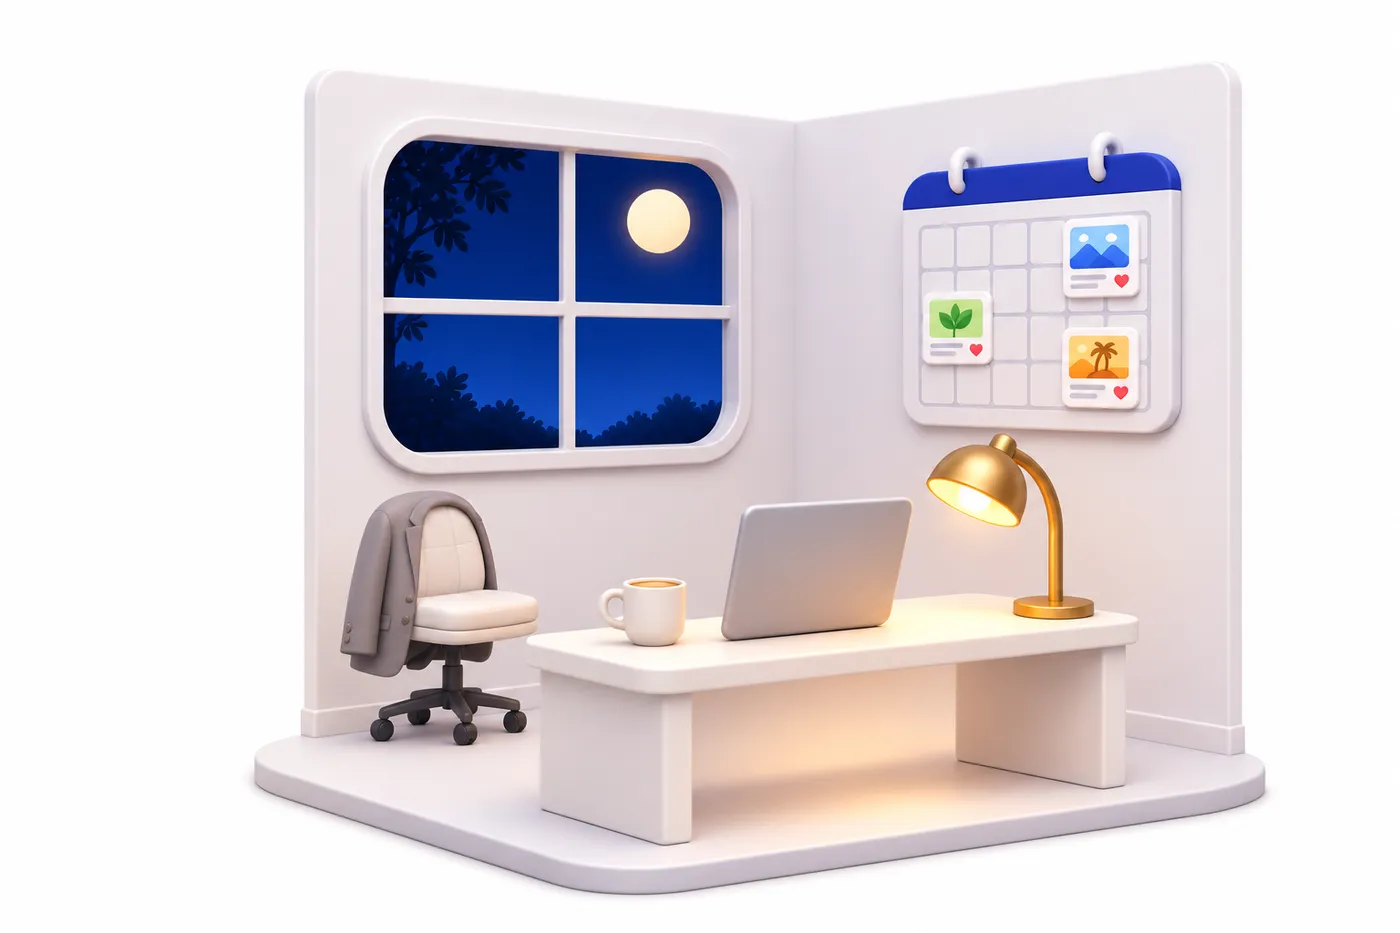
What finally worked was a simple story anyone gets at a glance: you went home, and your social media keeps running. That matches what Sociora does, which is planning and publishing posts on a schedule. A small robot works alone at a desk at night, beside an empty chair with a jacket on it.
Before you write a prompt, answer these three questions in one sentence each:
- What does the product do for the customer?
- What could a character be doing that shows that?
- What would make it clearly yours, and not a competitor's?
For the third question, we put our logo tile on the robot's head. Nobody else can copy that without copying the brand.
Step 2: Generate the first scene
Start a new chat and attach only your logo. Then send a prompt that describes the character, the scene and what to avoid. Here is the one that gave us our first usable robot.
Create a wide 3:2 website hero illustration for [PRODUCT], a [ONE-LINE DESCRIPTION]. The story: "[THE STORY IN ONE SENTENCE]."

CHARACTER
An original, lovable little robot:
- Head: a rounded square shaped exactly like the attached logo tile, in the same colors, with two friendly white oval eyes and a small, happy curved mouth. Use the logo mark only as a small symbol on its chest
- Body: a small, soft white bean shape with a satin finish
- Arms: two short, expressive arms with simple rounded mitten hands
- Base: it balances on one small rounded wheel instead of legs
- Personality: cheerful, focused, proud of its work
- Cute, simple shapes that would be practical to animate

SCENE
A single miniature room, like a handmade studio model, in a 3/4 view, placed on the right side of the image:
- [DESCRIBE THE SETTING, FOR EXAMPLE: a simple white desk with rounded corners]
- [DESCRIBE WHAT THE CHARACTER IS DOING, FOR EXAMPLE: typing on a laptop with one hand and sending off a post card with the other]
- [ONE OR TWO DETAILS THAT TELL THE STORY, FOR EXAMPLE: an empty office chair with a jacket on it]

STYLE
Polished, warm and tactile, with soft light. Use white, [BRAND COLOR 1], [BRAND COLOR 2] and small warm accents. Keep the background plain white and the left half of the image completely empty for a website headline.

AVOID
Astronauts, helmets, visors, space suits, galaxies, sparkles, conveyor belts, factories, circular platforms, grayscale clay, people, real company logos, text, numbers and watermarks.
The Avoid list matters as much as the description. Each item there is something that kept appearing, or something that would have made the mascot look like someone else's.
Step 3: Critique it, then fix it in the same chat
The first robot was about 70% right. The story worked, but the blank cards looked like sticky notes, the head had a panel that looked like a visor, and a purple haze covered everything.
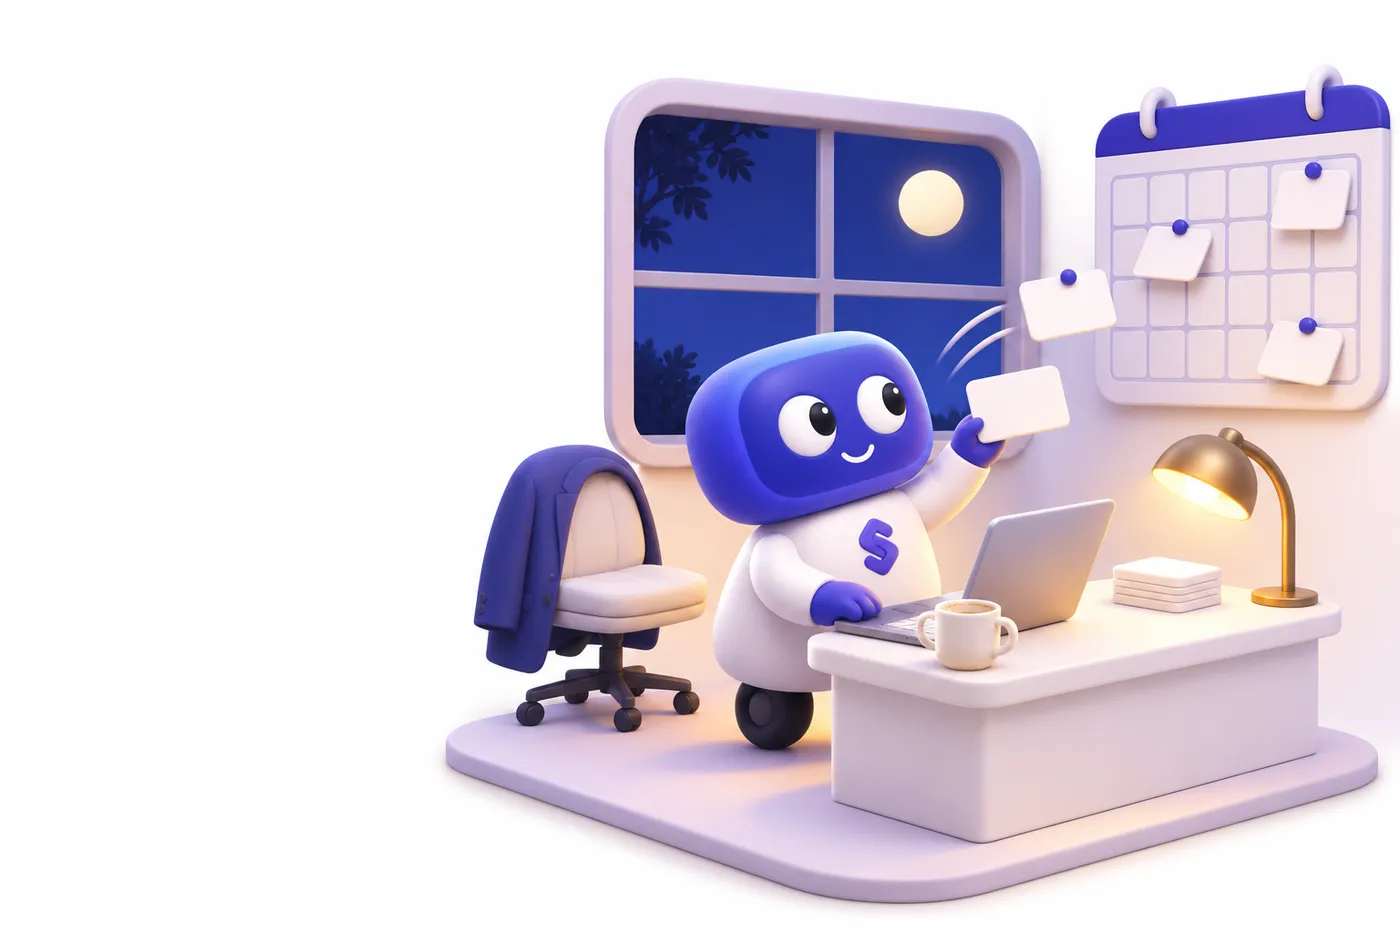
Write your feedback as a list of exact changes, and stay in the same chat so the tool keeps the context. This is the correction prompt that got us to the approved version.
Good concept. Keep the story and overall style, but rebuild the image with these corrections.

CHARACTER
- Head: exactly the rounded square shape of the attached logo tile, not a wide capsule. Use the logo's exact colors, [HEX 1] to [HEX 2]. Make it one smooth surface, with no inset panel, visor or screen
- Face: two simple white oval eyes set directly on the head, with small pupils looking calmly at the viewer, and a small, happy curved mouth
- Wheel: fully visible and clearly attached under the body

POSITION
- The character is the clear focus, in the center of the scene, behind the desk and facing the viewer in a slight 3/4 view
- [WHERE EACH HAND IS AND WHAT IT HOLDS]

MAKE IT ABOUT [YOUR PRODUCT]
- [THE ONE CHANGE THAT MAKES THE IMAGE SAY WHAT YOUR PRODUCT DOES. OURS: every card is now a small social media post with a colorful image thumbnail, two short gray lines and a tiny heart icon, with no words]

ROOM
- Make it a clean room corner with two walls and one floor, all in the same perspective
- [FIX ANY OBJECTS THAT LOOK WRONG, FOR EXAMPLE: one coffee mug with a single handle]

LIGHT AND BACKGROUND
- Use clean, neutral studio light with one warm pool of light from the desk lamp, only on the desk
- Make the background outside the room pure white, with no glow or gradient
- Keep the left 40% of the image completely empty

AVOID
Visors, helmets, astronauts, googly eyes, duplicate objects or handles, real company logos, text, numbers and watermarks.
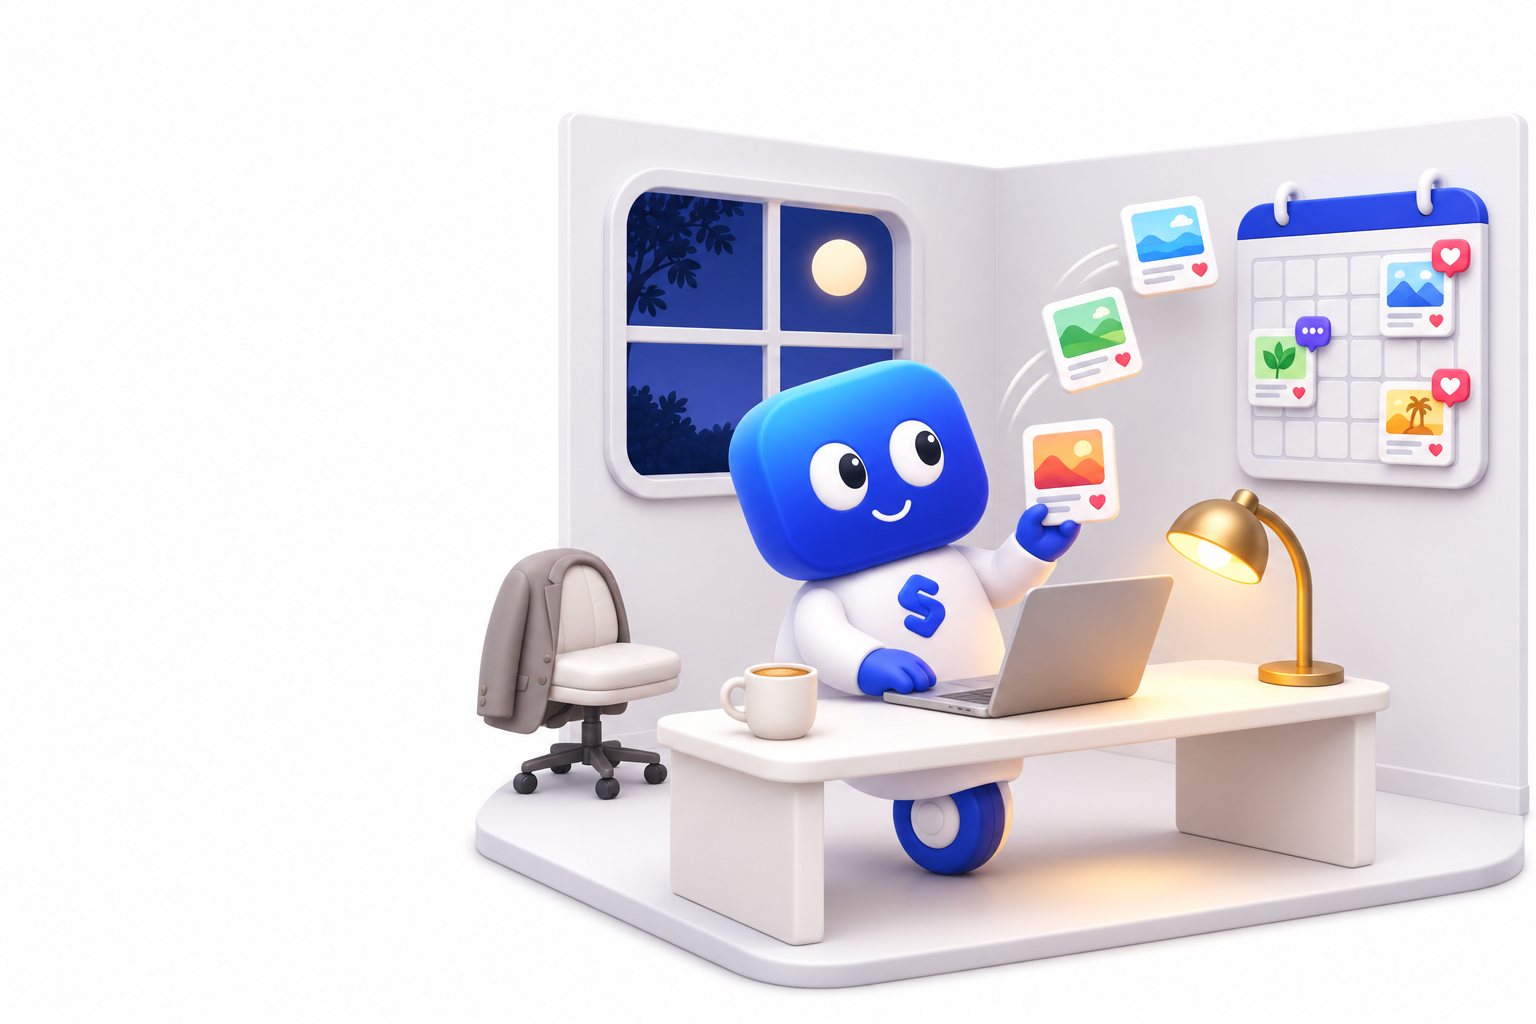
That round produced the image at the top of this page, which we approved.
Step 4: Lock the character with a character sheet
Stop regenerating the whole scene once the character is right. Every new full image can change the face, the proportions or the colors. Instead, ask for a character sheet: the same character shown in several poses on a plain background. This becomes your reference for everything after it.
This character is very close. Create its official character sheet, keeping the same design: [LIST THE PARTS, FOR EXAMPLE: rounded blue square head, white bean body, blue mitten hands, logo on the chest and a blue-and-white wheel].

Refine only these details:
- Eyes: slightly smaller and calmer, set a little deeper into the head, so they look friendly and intelligent, not googly
- Gaze: both pupils look directly at the viewer unless the pose says otherwise
- [ANY OTHER SMALL FIX]

Show the same character 8 times on a pure white background, evenly spaced, with nothing overlapping or cropped:
1. Front view, neutral
2. Three-quarter view, neutral
3. Side view, neutral
4. Back view
5. Typing with both hands, looking down, focused
6. Holding up a small [PROP] with one hand, looking at it proudly
7. Waving at the viewer, happy
8. Eyes closed in a happy smile, leaning back, satisfied

Keep the proportions, colors, face and materials identical in every pose. Use soft, neutral studio light with gentle contact shadows.

Avoid props other than the [PROP], backgrounds, visors, helmets, text other than the logo on the chest, labels, numbers and watermarks.
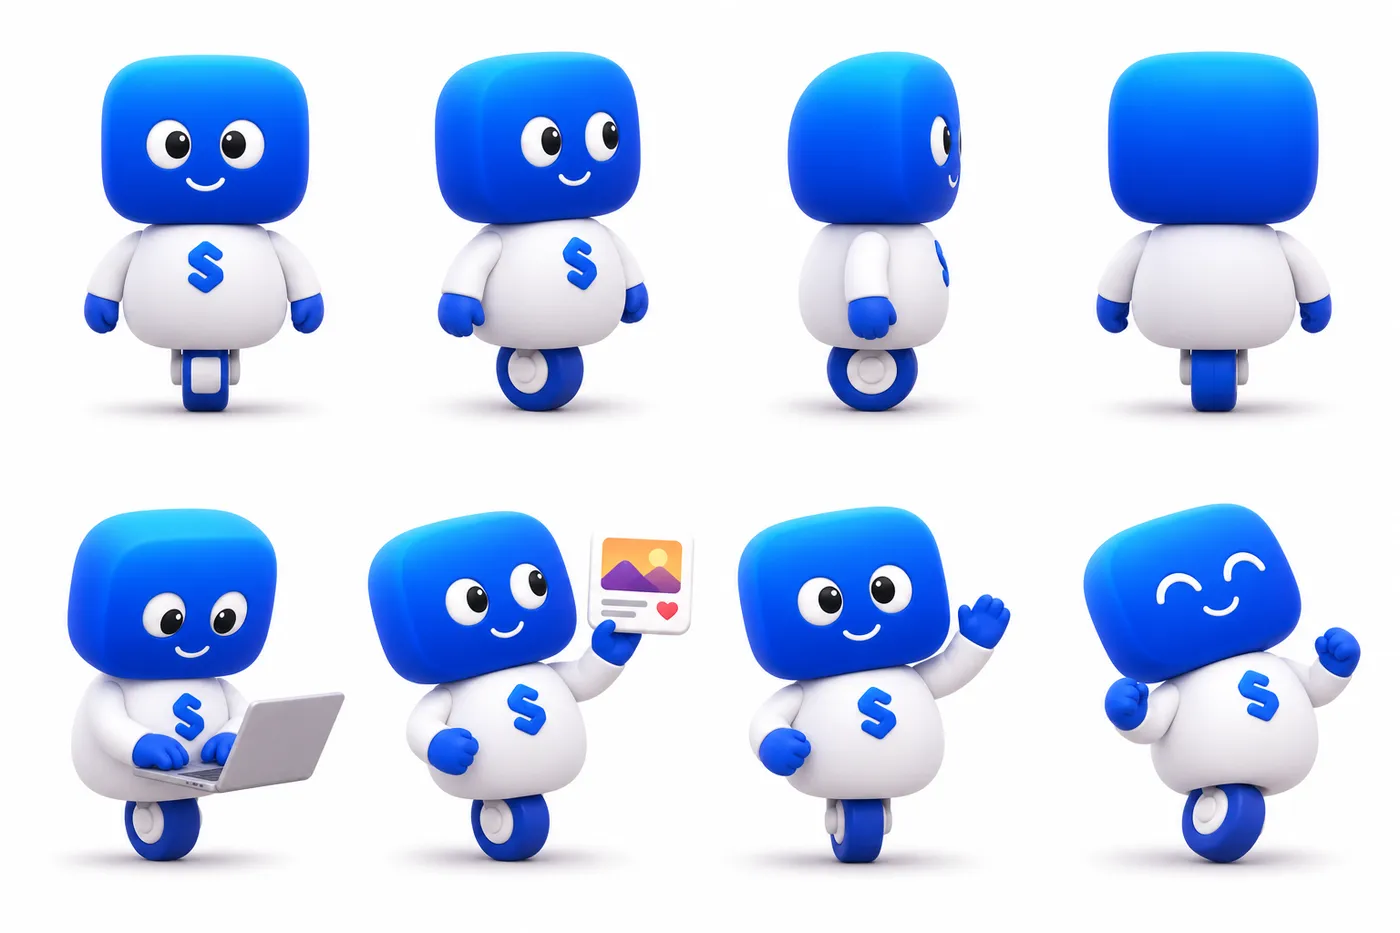
These poses are useful on their own. We built them into Sociora's login screen, its "page not found" screen and its empty states as still images, where a moving scene would be too much.
Step 5: Generate the parts you need for animation
A flat image cannot move. If you move the robot's arm, there is nothing behind it but a hole. So you need the background without the character, and the small moving objects on their own.
Send these one at a time in the same chat, so the style stays the same. Download each one at full size.
Recreate the same room with the same angle, style and lighting, but remove the character and the flying [PROPS]. Keep [LIST EVERY OBJECT THAT STAYS]. Leave a clear margin around the whole room, with nothing touching the image edges. The background is pure white. No text or watermarks.
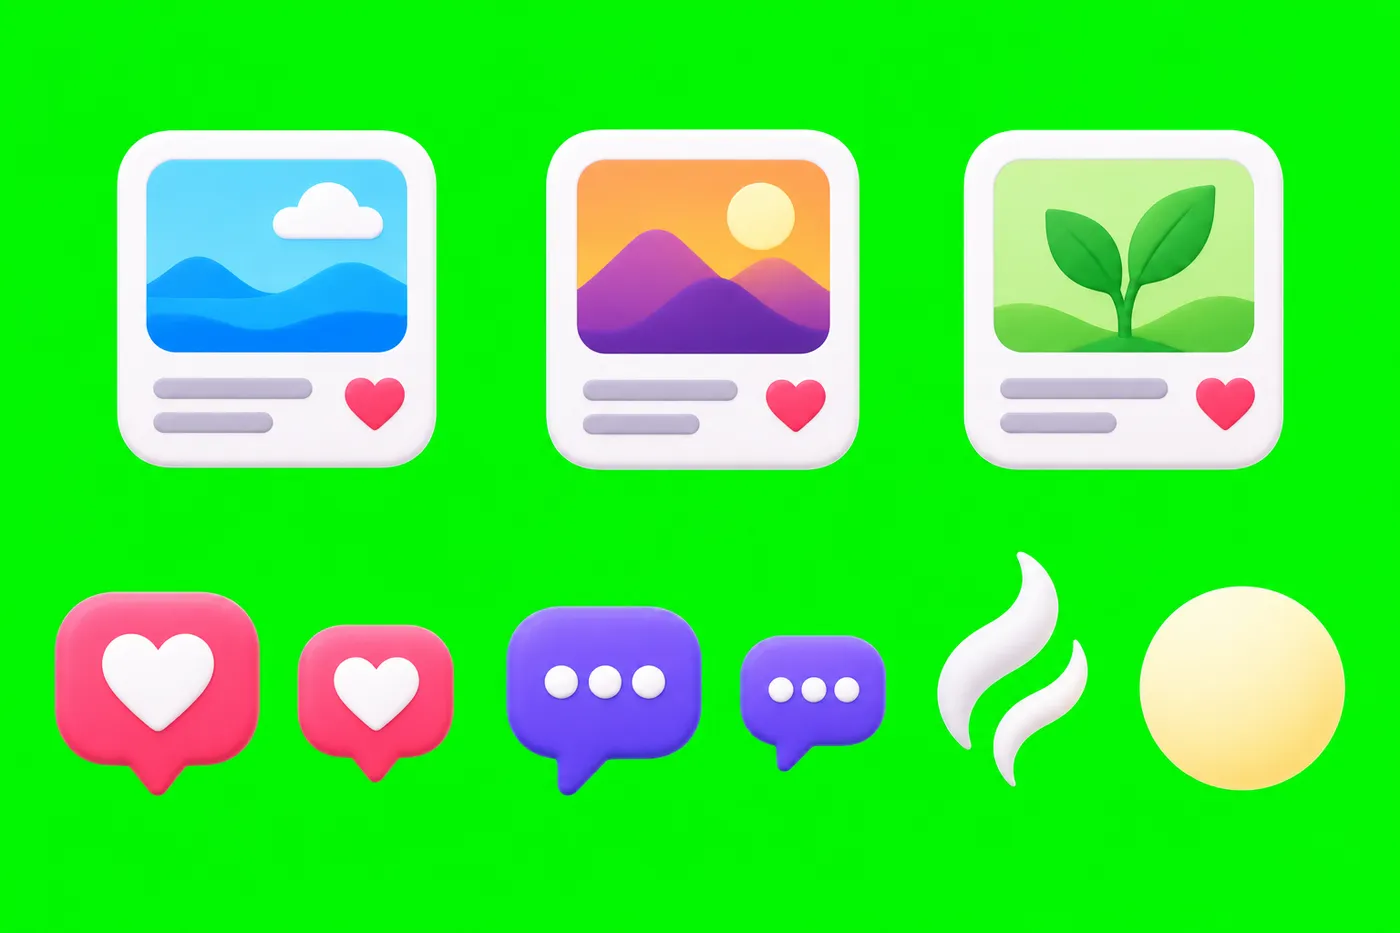
In the same style, create a sheet of separate small objects: [LIST THEM, FOR EXAMPLE: 3 social media post cards with different colorful image thumbnails, 2 pink heart bubbles, 2 purple comment bubbles, a wisp of soft white steam and a soft yellow moon]. Space them widely with nothing overlapping. Use one flat, solid bright green background (#00FF00), with no shadows on it. No text or watermarks.
We asked for bright green because white parts disappear on a white background, and a flat green is easy to remove with a script.
Step 6: Cut the character from the approved image, not from a parts sheet
This is the most important lesson from the whole project.
We also asked ChatGPT for the robot itself in separate pieces: head, eyes, body, arms, hands and wheel, each on green. It looked perfect at first glance.
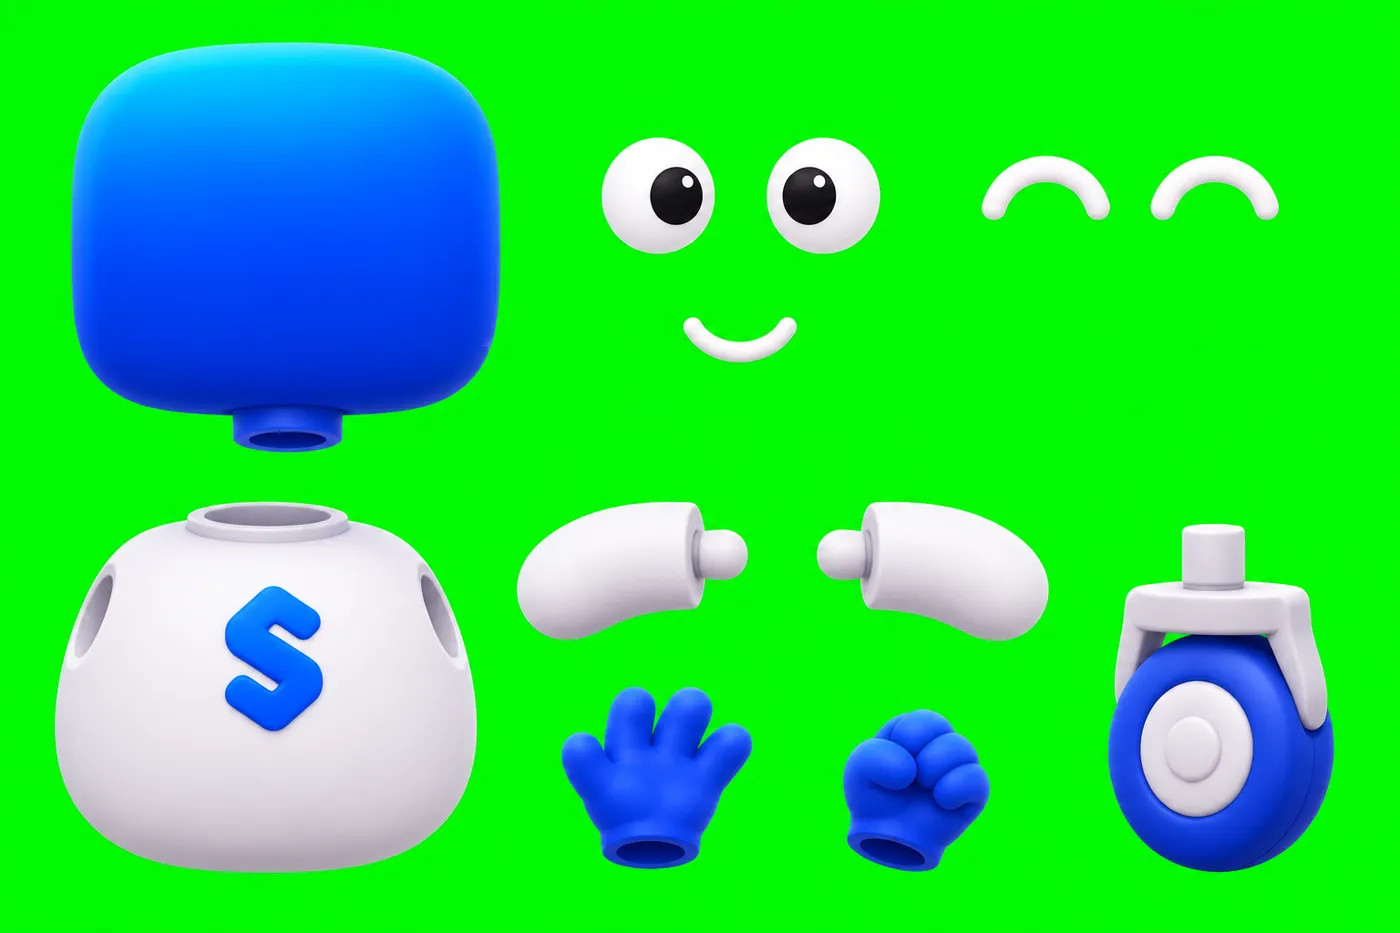
It was not the same robot. The parts sheet drew ball joints, a thin neck and a bigger glove. When we built the first animation from it, the result looked like a mechanical puppet, and it was rejected. We had also said it looked good without putting it next to the approved image. That was our mistake.
The fix was to cut the robot's layers out of the approved image itself: the head, the body, the arm and the typing hand. Where a moving part had covered the wall, the wall had to be rebuilt behind it. The green sheets were still useful for the small props, which have no "correct" version to drift from.
Step 7: Animate it in code
Claude cannot generate images, but it can write the code that moves them, and it can do the cutting with a short script. We worked with Claude Code in the app's repository. The final animation is plain browser code: each layer is an image, and one function places every layer for a given moment in time. That makes the loop seamless and lets any single frame be drawn on its own.
We did not send one perfect prompt. The text below collects what we asked for over several messages, so you can start where we finished.
I have an approved illustration of our mascot at [APPROVED IMAGE PATH], an empty background at [BACKGROUND PATH], and a props sheet on flat green at [PROPS PATH]. Build a looping animation for our website hero.

Work in a scratch folder first, and do not change the live site.

1. Remove the green from the props sheet and save each prop as its own transparent WebP.
2. Cut the character into layers from the APPROVED image, not from any parts sheet: [LIST LAYERS, FOR EXAMPLE: head, closed-eye head, body, arm, typing hand, wheel]. Rebuild any background that a moving part uncovers.
3. Assemble the layers over the background so the still frame matches the approved image.
4. Animate a [LENGTH, OURS WAS 12]-second seamless loop:
   - [WHAT THE CHARACTER DOES, FOR EXAMPLE: types, blinks, lifts a post card, throws it onto the calendar three times, waves at the viewer]
   - [WHAT THE PROPS DO, FOR EXAMPLE: cards fly in an arc and land, a heart pops up on each landing, coffee steam drifts]
   - Make every pose a function of time, so the loop has no jump at the end.
5. Use no animation library unless the project already has one.
6. Respect prefers-reduced-motion by showing one still frame that tells the story. Add a pause button. Pause the animation when it is off screen.
7. Keep all images together small enough to load quickly. Tell me the total size.

When you check your work, put frames from the animation next to the approved image and list every difference you see. Do not tell me it looks right until you have compared them side by side.
Step 8: Check it like a visitor
The person who made something is the worst judge of whether it is right. The founder sent our "finished" build back, and when we stepped through it frame by frame we found what we had missed: a streaky seam in the wall behind the arm and a dull gray patch inside the hand. Then came honest feedback that the robot looked "a little fat." We made the head and body about 9% narrower. Going much further would have stretched the art.
Check these before you ship:
- Side by side: put several frames next to the approved image. Look at the face, the hands and the colors first.
- Seams: step through the loop slowly and look at every place where a part moves over the background.
- Phone width: make sure the scene fits a narrow screen with no sideways scrolling.
- Reduced motion: turn on "reduce motion" in your device settings. You should see one still frame that still tells the story. [4].
- Pause: anything that moves on its own for more than five seconds should have a way to pause it. That is a [5], not just good manners.
- Weight: add up the file sizes. Large hero images slow down the first thing visitors see.
What we ended up with
These numbers come from the files in the project, not from estimates:
- 19 layer images for the animated desk scene, about 220 KB together, all in WebP
- 8 still poses for the app's other screens, about 124 KB together
- A 12-second loop: the robot types, throws three posts onto the calendar, smiles when each one lands and waves near the end
- One still frame for visitors who prefer reduced motion, a pause button, and the loop stops while it is off screen
The animated image above is about 780 KB because it stores 120 full frames. The version on the page is much lighter because it moves the 19 layers in code instead.
Common mistakes and limits
- Starting from a shape. A mascot based only on a letter or an object has nothing to do. Start from the job your product does.
- Regenerating the whole scene to fix one detail. Use the edit tool for small fixes, and lock the character with a sheet as soon as it is right.
- Trusting a parts sheet. The parts will look close but not identical. Cut anything that must match from the approved image.
- Hiding the hands. We kept writing "no arms" to stay away from a competitor's look, and ended up with characters that could not act. Give your mascot hands if it needs to work.
- Saying "done" without comparing. Put the build next to the approved image every time.
- Assuming it is unique. A prompt cannot guarantee originality. Run the final design through a reverse image search such as [7] or [8] before launch.
- Assuming you own it outright. The [3] has said that material generated by AI from a prompt alone is not protected by copyright. Human changes, selection and arrangement may be. If your mascot will carry a brand, talk to a lawyer about trademark protection.
- Expecting Claude to draw it. Claude writes the prompts and the code. The pictures came from ChatGPT.
Tools and resources
- ChatGPT Generates the character, the scene and the separate parts. Image limits depend on your plan. chatgpt.com
- Claude Code Works inside your project to cut out parts, assemble layers and write the animation. Needs a paid Claude plan or API credits. anthropic.com
- MDN: requestAnimationFrame The browser feature that runs a smooth animation loop without any library. Free. developer.mozilla.org
- MDN: prefers-reduced-motion How to detect visitors who have asked for less motion. Free. developer.mozilla.org
- TinEye Reverse image search, to check that your mascot is not too close to an existing one. Searching on the website is free. tineye.com
Download the prompts
Every prompt in this guide, in one plain text file you can keep and edit:
Frequently asked questions
Can Claude generate the mascot images?
No. Claude does not create images. In this workflow it critiques the images, writes the prompts, removes backgrounds with a script, and writes the animation code. The images came from ChatGPT.
Why not animate the generated image directly?
A generated image is one flat picture. When a part moves, there is nothing behind it. You need the background on its own and the moving parts on their own, and they all have to match the approved design exactly.
How many image rounds should I expect?
It depends on how clear your idea is. We needed five rounds to reach an approved scene, across three different ideas, then one character sheet and three images of separate parts.
Do I need an animation library?
Not for a loop like this. Our scene uses plain browser code and no animation library. A library can help with more complex, interactive characters.
Sources
- Using ChatGPT's Free plan, OpenAI Help Center (help.openai.com)
- Claude pricing, Anthropic (claude.com)
- Copyright and Artificial Intelligence, U.S. Copyright Office (copyright.gov)
- prefers-reduced-motion, MDN Web Docs (developer.mozilla.org)
- Understanding Success Criterion 2.2.2: Pause, Stop, Hide, W3C (w3.org)
- Window: requestAnimationFrame() method, MDN Web Docs (developer.mozilla.org)
- Google Lens, Google (lens.google)
- TinEye reverse image search, TinEye (tineye.com)
Spot an error? Tell us. See how we handle sources and corrections in our editorial standards.
Found this useful? Get The Weekly Desk, one concise email a week.